
Detangling API Spaghetti with TakeShape's API Mesh

It doesn't have to be this hard.
We deal with APIs a lot. So much so that I'd take the over/under that you've used an API more times than you've eaten a fruit today. At first, you're happy with your neat and elegant API layer, but then you add another service. And another service. And another service. Before you know it, your codebase is a mess and you've got a garbled glob of nonsense on your hands that gets harder and harder to maintain as the years go by (I'm speaking from experience there).
What if there was a way to offload all of that garbled nonsense? Something like a postal service, collecting messages from all the right people and delivering it to us in one nice, neat bundle.
TakeShape is that postal service.
Word to the wise: I'm going to be largely ignoring the issue of security because TakeShape handles most of it for me. But if you're consuming APIs the old-fashioned way, please be sure to include the proper security measures. The more APIs you add, the larger the opportunity for someone to take advantage of it, which is why I prefer using an API gateway in the first place.
Let's say you've split up your user information into a couple places. You're storing the user's email on the client when they login, so we've already got that handy. But to get the rest of the important information, we need to reach out to a couple different APIs and combine their responses. Maybe I've got something like this:
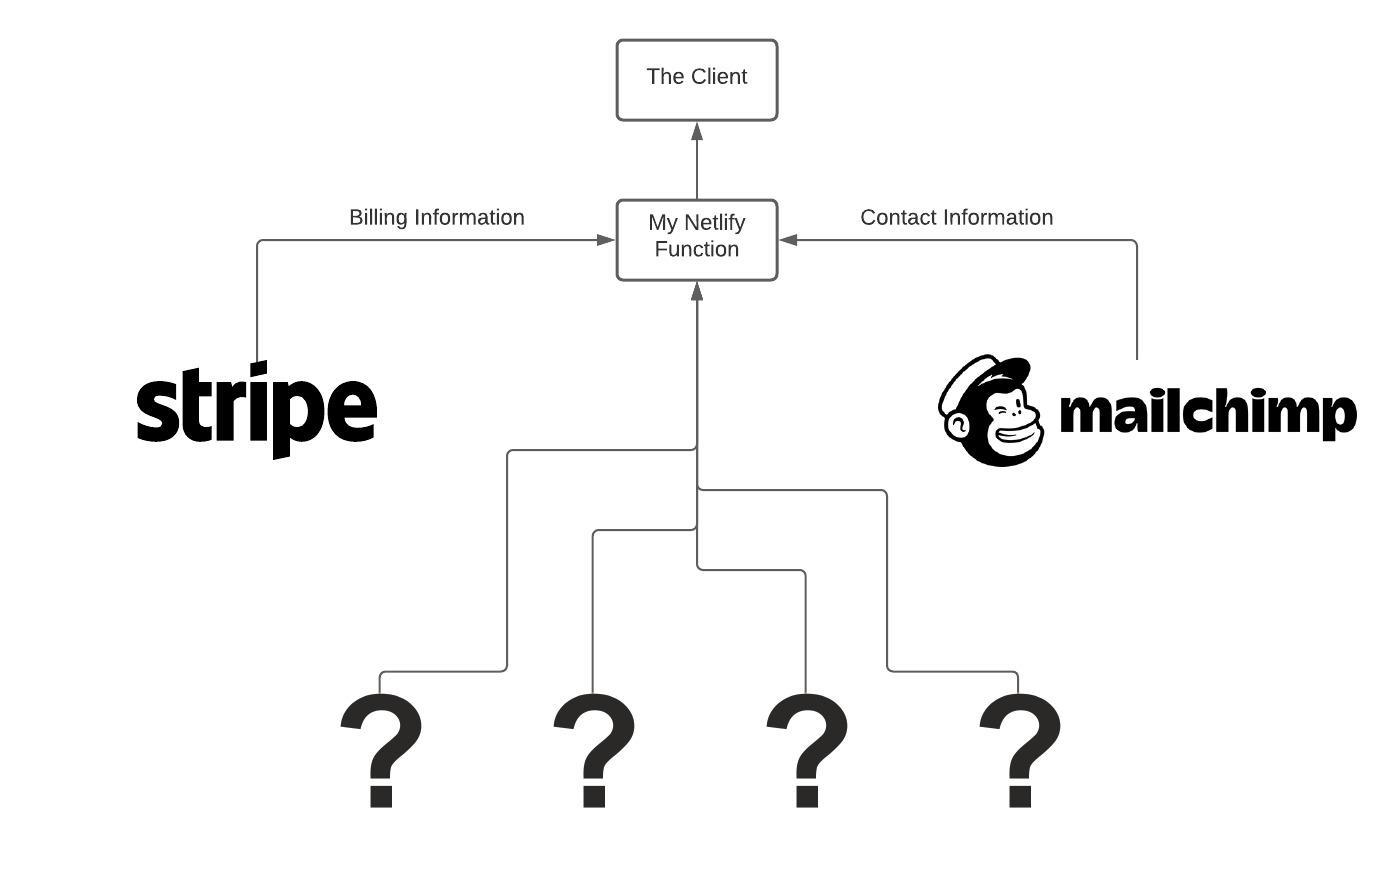
A common user data storage system. Each piece of data is being stored by whoever needs it the most.
In this rough flowchart, you can see the Netlify Function helpfully gathering data on our user from many different sources. In the real world, you might be using far more than just two APIs. Perhaps you're retrieving their user preferences data from Fauna, their level of access with Auth0, some analytics data from Intercom, or some of their files you've stored in Dropbox. Even with just Stripe and Mailchimp though, it's already fairly complex. In my example, I've got to check with Stripe first to make sure it's a valid account, and then synchronously with Mailchimp to get their email preferences. Using modern syntax like template expressions and async/await makes this easier on the eyes, but it's still a lot to code, debug, and maintain:
const fetch = require("node-fetch");

exports.handler = async (event, context) => {
	const STRIPE_API_KEY = "__redacted-stripe-secret-api-key__";
	const MAILCHIMP_SERVER = 'us1';
	const MAILCHIMP_API_KEY = `redacted-mailchimp-api-key-${MAILCHIMP_SERVER}`;

	const { email } = JSON.parse(event.body);
	// i'm not concerned too much with security for this example
		// our revised version will have that security built-in
		// but if you try the old-fashioned way, PLEASE secure it properly


	const stripe_resp = await fetch(
		`https://api.stripe.com/v1/customers?email=${email}`,
		{
			headers: {
				Accept: "application/json",
				Authorization: `Bearer ${STRIPE_API_KEY}`,
				"Content-Type": "application/x-www-form-urlencoded"
			}
		}
	);
	const stripe_data = (await stripe_resp.json()).data[0];

	const mailchimp_resp = await fetch(
		`https://${MAILCHIMP_SERVER}.api.mailchimp.com/3.0/search-members?query=${email}`,
		{
			headers: {
				Authorization: `Basic: ${MAILCHIMP_API_KEY}`
			}
		}
	);
	const mailchimp_data = (await mailchimp_resp.json()).exact_matches.members[0];

	return {
		statusCode: 200,
		headers: {
			'Access-Control-Allow-Origin': '*',
			'Access-Control-Allow-Headers': 'Content-Type'
		},
		body: JSON.stringify({
			email,

			email_type: mailchimp_data.email_type,
			address: mailchimp_data.merge_fields.ADDRESS,
			phone: mailchimp_data.merge_fields.PHONE,
			first_name: mailchimp_data.merge_fields.FNAME,
			last_name: mailchimp_data.merge_fields.LNAME,
			birthday: mailchimp_data.merge_fields.BIRTHDAY,

			stripe_customer: stripe_data.id,
			discount: stripe_data.discount,
			created: stripe_data.created
		})
	};
};
On Github at https://github.com/jadenguitarman/detangling-api-spaghetti/blob/main/get-user.js
Thankfully that modern syntax makes it somewhat understandable, but you can see that this doesn't scale. When I start adding in my calls to Hasura, Intercom, and Dropbox, and then throw in a bit of optimization on the asynchronous API calls, I'm going to get into a mess of broken Promises, uncaught errors, and un-debug-able bugs.
Luckily, we can just offload all of that garbled nonsense. This is where TakeShape comes in.
It only takes about 5 minutes to start consuming a third-party service like Stripe via TakeShape. I usually laugh when people make claims like that because anything can be done in 5 minutes if you're good enough at it, but that's not the case here; watch the video below as I actually go through the whole process, explain the whole thing along the way, and still get it done in less than 6. I'll put a transcription below if you prefer reading (but I strongly recommend watching the video instead since the concepts are better explained visually).
For those of you who prefer reading over watching the video, here's a rough breakdown of what I did:
- I went into the Schema tab of my project in TakeShape. I named mine "Ambassador Portal" (bonus points if you got the John Marbury reference). That Schema page is really where everything happens in TakeShape. You'll see the services, shapes, and queries in there, and they've helpfully created a bunch of them already for us. We're not going to concern ourselves with those built-in queries much at the moment, just because they're mainly applicable to the database side of TakeShape.
- The first step is to add Stripe as a service. Click Connect Service, and then REST. Start filling in the information it asks for, including the name ("Stripe"), the endpoint ("https://api.stripe.com"), the auth type ("Bearer"), and the auth token. Once you click the Save button, you should get put back on the Schema page and see Stripe come up as a service in the section near the top.
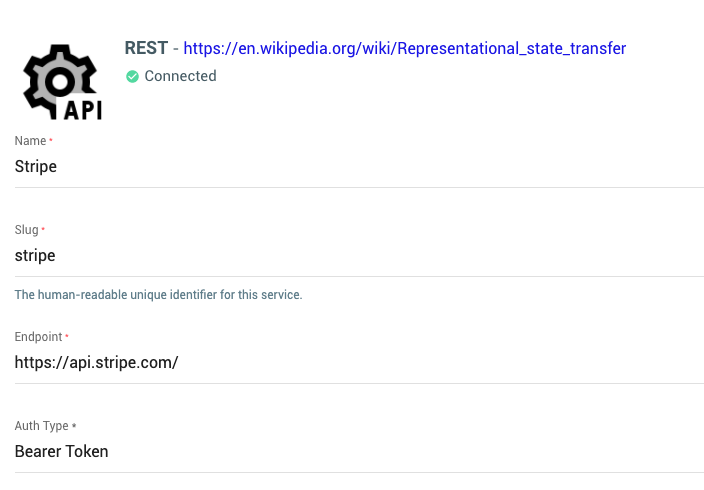
What adding a REST service looks like
3. Since Stripe is a REST API, we're going to need to add our queries and shapes manually (don't worry, it's very point-and-click). Queries are like functions for GraphQL; they just help us to combine information into one request. Shapes are more like instances in TypeScript; they just regulate what comes in and out of those queries and make sure that the objects that we're passing around have all the information you want. To add these queries and shapes, click the Export button at the top right of the Schema page. You should see a file start to download. It'll contain some JSON that represents all that TakeShape knows about your project's schema. We're going to edit this file and import it back into TakeShape so that it understands how to get the data you're looking for. The button you're looking for looks like this:

Export button on Schema page in TakeShape
4. In the JSON file, you'll need to create two shapes (one for input and one for output). They'll look something like this:
"shapes": {
        "getStripeUserArgs": {
            "id": "get-stripe-user-args-id",
            "name": "getStripeUserArgs",
            "title": "getStripeUserArgs",
            "schema": {
                "type": "object",
                "properties": {
                    "email": {
                        "type": "string",
                        "title": "Email"
                    }
                },
                "required": [
                    "email"
                ]
            }
        },
        "getStripeUserResults": {
            "id": "get-stripe-user-results-id",
            "name": "getStripeUserResults",
            "title": "getStripeUserResults",
            "schema": {
                "type": "object",
                "properties": {
                    "stripe_customer": {
                        "type": "string"
                    },
                    "discount": {
                        "type": "string"
                    },
                    "created": {
                        "type": "number"
                    }
                }
            }
        }
}
The shapes object
The gist of it here is that I'm just guaranteeing that I'm going to be giving the query an email and getting out the stripe_customer, discount, and created fields.
5. Then we need to create our query. It'll look something like this:
"queries": {
        "getStripeUser": {
            "description": "Returns the Stripe data for a provided email",
            "args": "getStripeUserArgs",
            "shape": "getStripeUserResults",
            "resolver": {
                "name": "rest:get",
                "service": "rest:stripe",
                "options": {
                    "path": "v1/customers"
                },
                "argsMapping": {
                    "email": [
                        [
                            "set",
                            {
                                "value": "args.email"
                            }
                        ]
                    ]
                },
                "resultsMapping": {
                    "stripe_customer": [
                        [
                            "get",
                            {
                                "path": "steps[0].data[0].id"
                            }
                        ]
                    ],
                    "discount": [
                        [
                            "get",
                            {
                                "path": "steps[0].data[0].discount"
                            }
                        ]
                    ],
                    "created": [
                        [
                            "get",
                            {
                                "path": "steps[0].data[0].created"
                            }
                        ]
                    ]
                }
            }
        }
    }
The queries object
Up near the top we define the name of the query and the shapes it uses for input and output (that's the ones we made in the last step), and then some instructions about how to bring the data from Stripe back to use through TakeShape. We noted that it should be a GET request, that it consumes the rest:stripe service, and that it should ping the v1/customers endpoint of the Stripe API.
The argsMapping object will pipe data we give it through GraphQL straight to Stripe (we could modify it here if we wanted to), while the resultsMapping object is doing the same thing for output. Stripe returns some really complex data, but I don't want all of that. I just want the id, created, and discount values of the first object in the data array that Stripe returns. So I don't have to deal with parsing that on the client side, I can just pipe the data[0].id value from the data that Stripe gives us straight into the stripe_customer value that gets sent back to the client (Psst... I actually demonstrate this with cURL at about 3:09 in the video. I told you it's better explained visually 😉 ).
6. Now the schema is complete, so I'll import it back into TakeShape at the terminal. You can install the TakeShape CLI from NPM with npm i -g @takeshape/cli. Then, make sure to takeshape login && takeshape link so that you're logged in and linked to the right project. Then you can run takeshape import --schema --from <your-schema-json-file>. Refresh TakeShape and you'll see the getStripeUser query pop up in the Queries & Mutations list.
We can actually test this out with the API tab and get exactly what we're expecting as long as our input matches the shape we defined in GetStripeUserArgs. Here's the query that matched what we defined earlier:
{
  getStripeUser (email: "john.marbury@government.co.uk") {
    stripe_customer
    discount
    created
	}
}
The getStripeUser query in action
And the response is exactly what we're expecting too, conforming to the shape we defined in GetStripeUserResults:
{
  "data": {
    "getStripeUser": {
      "stripe_customer": "cus_J7xy16gYDOcYN3",
      "discount": null,
      "created": 1615920879
    }
  }
}
The results of the getStripeUser query
I try this in the video on the API tab in TakeShape at around 4:51 in the video, if you'd like to see their straightforward GraphQL testing tool.
If we did all of this for Mailchimp too, we can completely replace the Netlify Function I made earlier. It only took me a few minutes to do this, and now we've got TakeShape abstracting away all of the complexity we had to deal with earlier.
I stepped through the process of creating an API mesh with TakeShape and explained as I went, but if you'd like more detailed information on what the specific pieces I demonstrated do and how they work together, the team at TakeShape wrote up some excellent documentation at https://www.takeshape.io/docs/schema/.
So here's what we end up with, after repeating the process on Mailchimp like I suggested at the end of the video:
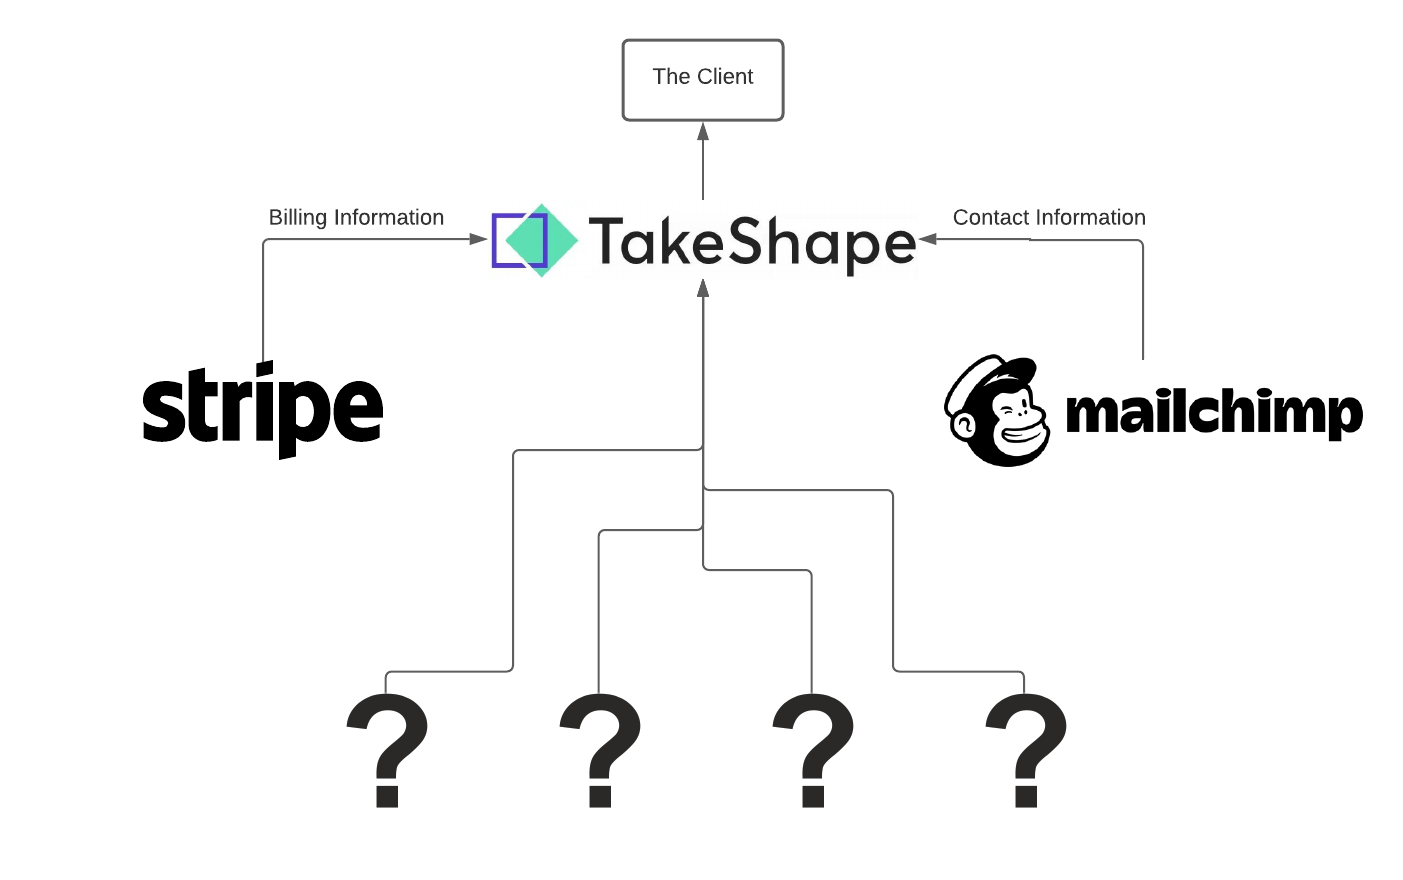
Our neat and newly-TakeShape-ified flowchart
Where's the backend code? Where's the broken Promises and un-debug-able bugs and all the errors and hours of maintenance we've come to love so dearly?
It's gone.
Instead of all the unscalable complexity of the traditional method of consuming our APIs, we've funneled everything into a single secure query.
I've spent whole weekends trying to figure out why my lambda function is failing, only to find out on Monday afternoon that I was missing a semicolon somewhere. If that sounds anything like you, give TakeShape a shot! I had a lot of success with it, and I'm definitely going to be sticking it in more projects. I didn't even get to talk about the database portion of TakeShape, which all ties into the same process, so start snooping around in the docs if you'd like to learn more.