With the power vested in me by OneSignal and TakeShape...
TakeShape and OneSignal work together swimmingly. Check out how their dev advocate Pato and I built something awesome together.
Hi, Jaden here. I reached out to my bud Pato at OneSignal about working on a project together back in mid-August. Since then, we've been cooking up a little sample project that experiments with the combination of OneSignal's push notifications tech with TakeShape's powerful API mesh, and boy, we had a blast. In this article, Pato and I will go back and forth explaining a bit about what we accomplished and why we went about it that way. If you want to follow along, check out the GitHub repo. Here's the plan:
- Build an app that will look up a country based on its abbreviation and send the user a push notification
- Use OneSignal's SDK to do the subscription registration for push notifications
- Send the actual notification with OneSignal using an API call from TakeShape
- Use TakeShape to set up a pipeline for the data that can be triggered with a single GraphQL API call instead of multiple separate callsIt'll be our app → TakeShape API mesh → Countries API → TakeShape API mesh → OneSignal API → return to our app. All in one request.
- Turn this into a starter project to help people get going with TakeShape and OneSignal
- Try to make it look pretty so that people don't ridicule us for making something cool without it looking the part
So now that we have our goal, I'll turn it over to Pato to explain how he got the initial OneSignal project set up.
Howdy! This is Pato. We want to integrate push notifications into our web application. Before we begin, we need to define what push notifications are.
What are push notifications?
Push notifications are messages that appear on your device. The browser's Push API gives web applications the ability to receive the messages from a server whether or not the web app is in the foreground or currently loaded on a user agent. This lets you deliver asynchronous notifications and updates to users who opt-in, resulting in better engagement with timely new content.
This tutorial will cover how to integrate OneSignal push notifications into your app using our typical setup process and how to send push notifications using the OneSignal REST API.
Part 1: Set Up Your OneSignal Account
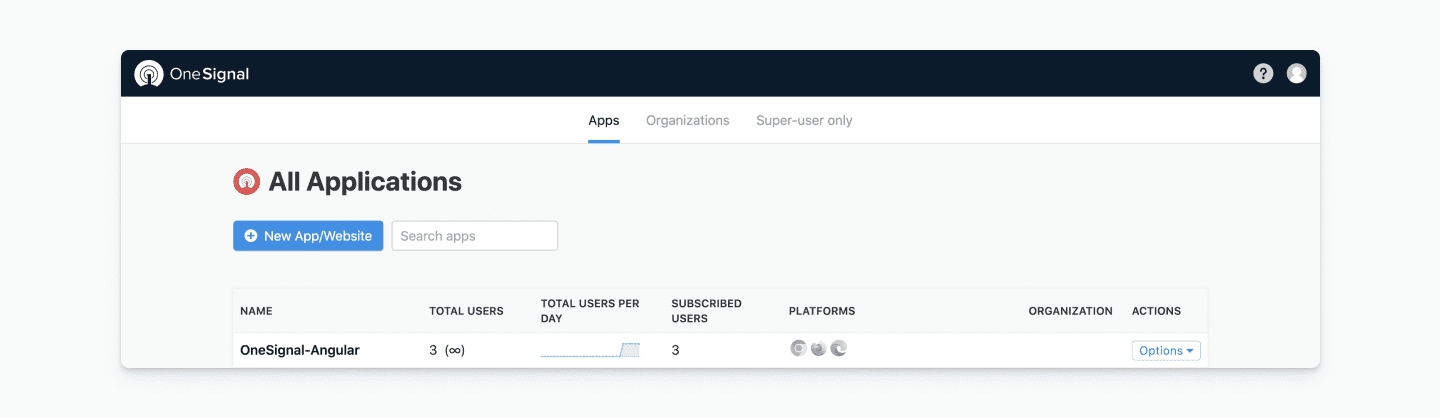
To begin, login to your OneSignal account or create a free account. Then, click on the blue button entitled New App/Website to configure your OneSignal account to create your app or website.
Configure the name of your app or website. Select Web Push as your platform.
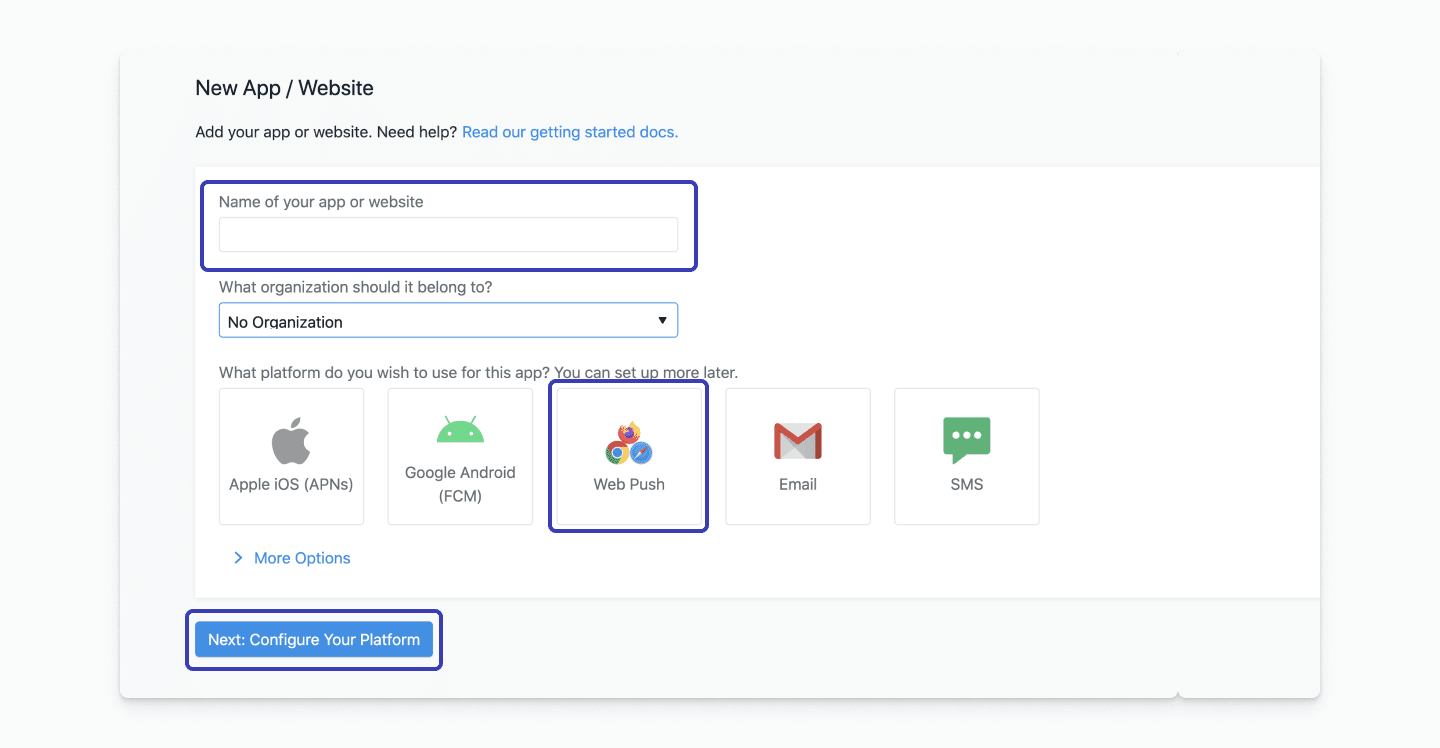
Click on the blue button entitled, Next: Configure Your Platform.
Web Configuration
Under Choose Integration, select the Typical Site option.
In the Site Setup section, enter your chosen web configuration. In my case, the configuration looks like this:
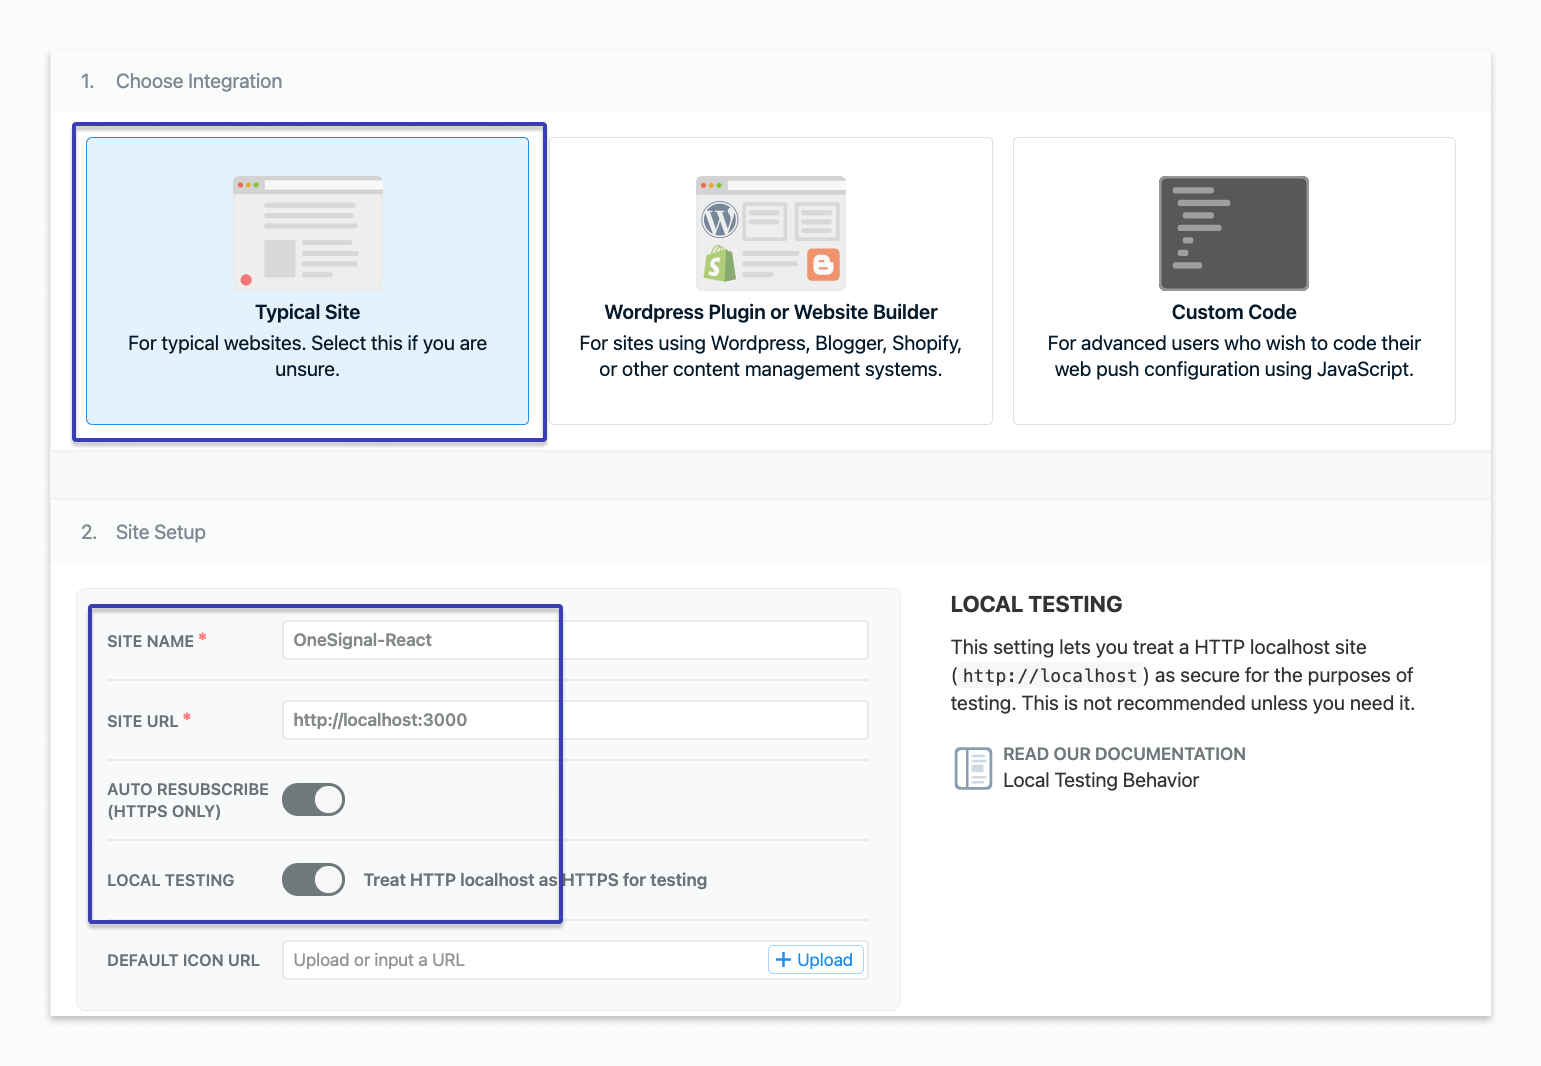
Notice for testing purposes I’m entering my localhost URL (http://localhost:3000). If you are doing the same, make sure you click on the LOCAL TESTING option. This will ensure to treat HTTP localhost as HTTPS for testing.
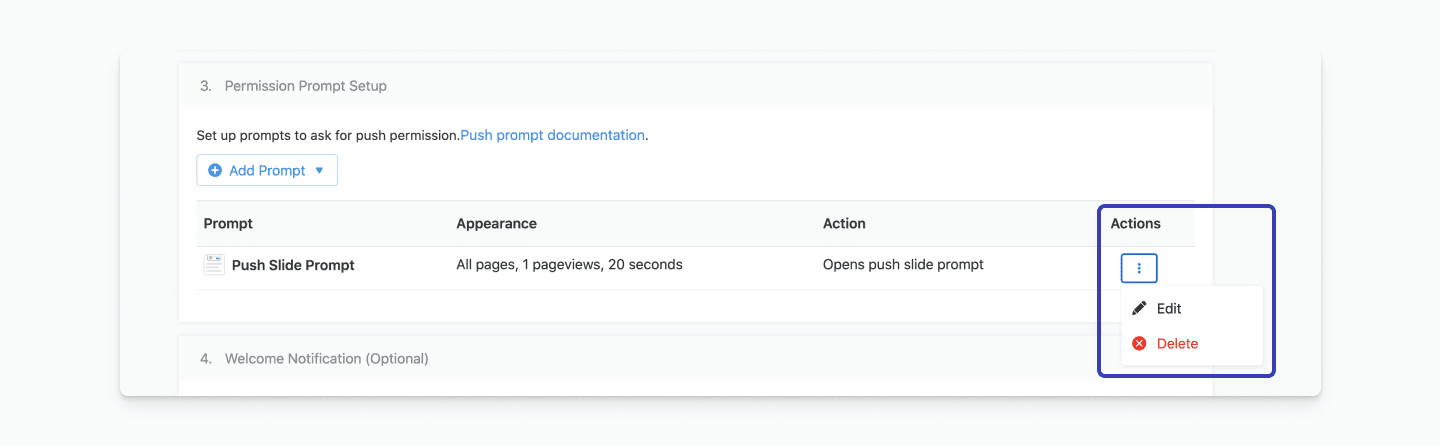
Under Permission Prompt Setup, you will see three vertical blue dots under the Actions header on the far right side of the screen. Click on the blue dots and select Edit from the drop-down menu.
A window will open with the configuration of our push notification Slide Prompt. Confirm that Auto-prompt is enabled (toggled to the right).
Under Show When, you can choose how long your slide prompt will delay after a user visits your page. You can leave it as it is, or you can reduce the seconds so that your prompt appears sooner. Once you've chosen your delay time, click the grey Done button located at the bottom right corner of the window.
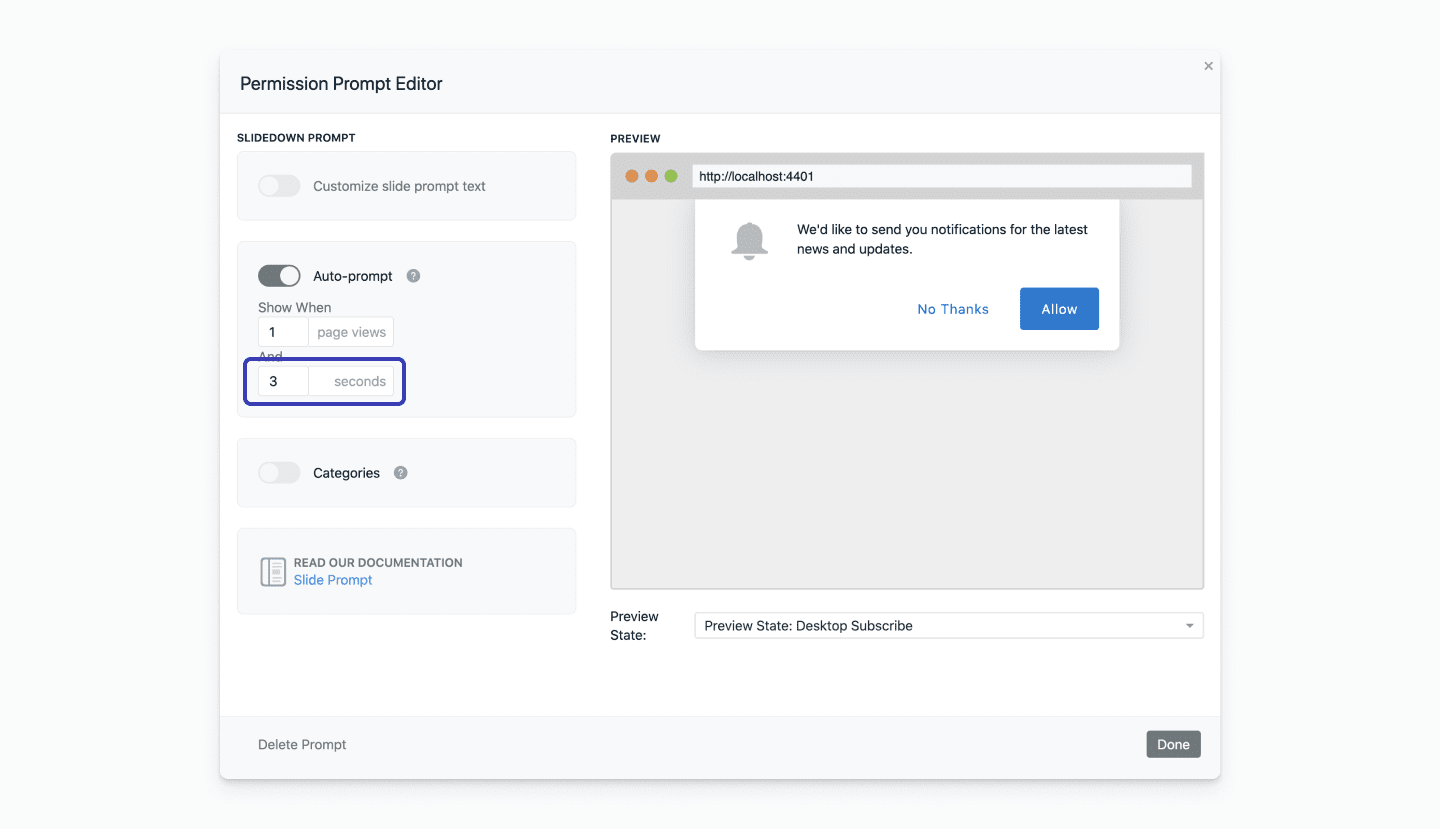
After clicking Done, scroll down to the bottom of the page and click Save to save your auto-prompt configurations.
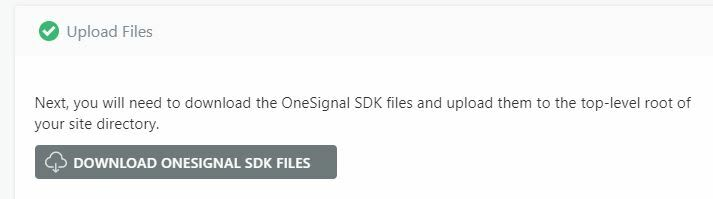
You will be redirected to a different page with an important step: Downloading the SDK files. Click DOWNLOAD ONESIGNAL SDK FILES and save them on your computer to retrieve later. We'll show you where to put them in a bit after we set up our site's directory.
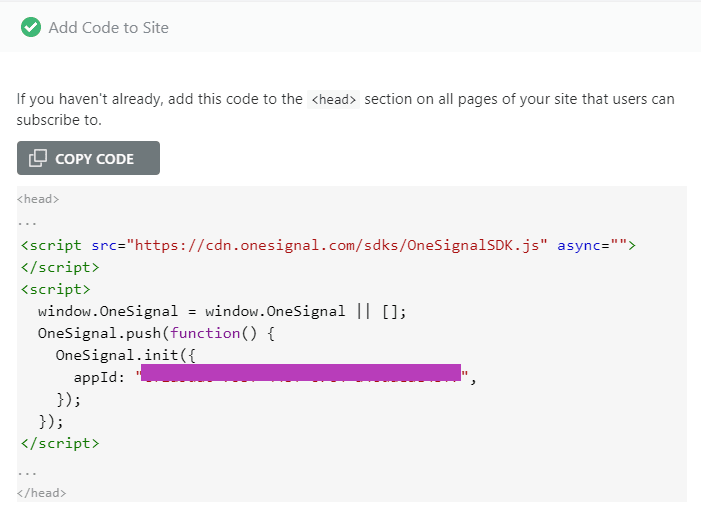
Under the section entitled Add Code to Site, you will see a grey button that allows you to copy the code snippet. Click the grey COPY CODE button.
Jaden here again. While Pato was working on that, I was working on setting up that pipeline I mentioned earlier. The first step was to find the right API. At first, we were thinking of using something more fun and quirky like the PokeAPI but we ended up settling on something a little more useful (well, I suppose that depends on how you spend your free time) with the CountriesAPI.
Thanks to Trevor Blades at Apollo for designing this API.
I found that these next few steps weren't as difficult as I expected them to be. I went to takeshape.io and started a new project like this:
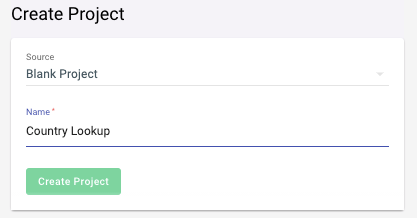
I just had to make sure I was making a new blank project instead of following a predefined pattern.
Once that was done, I could just connect up my two services. There's a shortcut Connect Service button on the homepage of the project that'll take me to a form that I filled out once for OneSignal and once for the CountriesAPI. This is what the latter config looked like by the way:
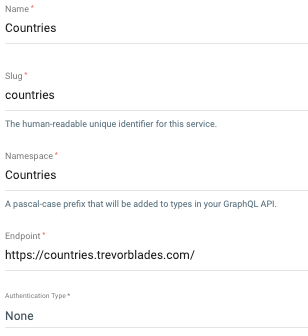
It was basically plug'n'play. OneSignal's setup was similarly easy since their API key is actually sent along with the JSON body, so we'll get to that in a bit.
The next step was to create the GraphQL mutation that will first look up a country's data from the CountriesAPI and then ping OneSignal with that data plus our API key, the hash identifying which device to send the notification to, plus the country code inserted into the URL of the CountryFlags API so we can get an image on the push notification too. Here's the text of the query in the schema's JSON file:
/*
	Obviously JSON doesn't have comments, but I'm going to add a
	few JavaScript-style comments to explain what each line does
*/


"mutations": { // this is the mutations object in the root of our schema JSON file
    "sendPushNotification": { // the name of this mutation
      "description": "Sends a push notification to the given subscribed user with the given image and content.",
      "args": {
        "type": "object",
        "properties": {
					/*
						these are the arguments coming into the mutation
						usually you'd make a shape for it and just put "args": "NameOfInputShape"
						here I've opted to list the arguments in the mutation
						no reason other than that it feels right
						we have two arguments defined below, both strings
					*/
          "user": {"type": "string"},
          "countryCode": {"type": "string"}
        },
        "required": ["user", "countryCode"] // both arguments are required
      },
      "shape": "OneSignalResult",
			/* ^^^^^ is the shape of the result,
			but we don't really care about our output from onesignal here */
      "resolver": { // aka how we fill in the output steps
        "compose": [ // we're going to do that by following this array of steps
          {
            "name": "graphql:query", // use graphql
            "service": "countries",  // to send a ping to the countries service
            "options": {
              "fieldName": "country", // to get this type with the following query
              "selectionSet": "{ name native continent { name } capital currency }"
            },
						// below, map the `countryCode` from our input to `code` so CountriesAPI will understand
            "argsMapping": {"code": [["get", {"path": "args.countryCode"}]]}
          },
          { // after finishing the request to CountriesAPI, start step 2 of the resolver
            "name": "rest:post",                   // it's a post request
            "service": "onesignal",                // to the onesignal service
            "options": {"path": "notifications"},  // specifically to the /notifications endpoint
            "argsMapping": {
              "json.chrome_web_icon": [ // send an argument called "chrome_web_icon" to onesignal
                [
                  "expressionEval",
                  { // "chrome_web_icon" should be a URL to countryflags.io with the original country code in it
                    "expression": "'https://www.countryflags.io/' + args.countryCode + '/flat/64.png'"
                  }
                ]
              ],
              "json.app_id": [ // set our app_id to a constant (redacted here for obvious reasons)
                ["set", {"value": "MY-REDACTED-ONESIGNAL-APP-KEY"}]
              ],
							// send our original input user id as the only element in an array called "include_player_ids"
              "json.include_player_ids[0]": [["get", {"path": "args.user"}]],
              "json.contents.en": [ // send along an object called "contents" with a key "en"
                [
                  "expressionEval",
                  { // set the key "en" to this long message with data from the CountriesAPI
                    "expression": "steps[0].native + '(' + steps[0].name + ') is in ' + steps[0].continent.name + '. In the capital, ' + steps[0].capital + ', the people like to spend ' + steps[0].currency + '.'"
                  }
                ]
              ]
            }
          }
        ],
        "resultsMapping": {"id": [["get", {"path": "steps[1].id"}]]} // send the notification id to our output
      }
    }
  }
That JSON without all the comments is uploaded into TakeShape. I actually just did it through the editor in the project, but you can do it through the terminal as well if you prefer.
So to summarize, what all of this produces is the ability to send this GraphQL query to our TakeShape API mesh endpoint:
mutation {
	sendPushNotification (
		user: "my-onesignal-user-id-from-the-sdk",
		countryCode: "US"
	) {
		id
	}
}
and then TakeShape will basically do the following steps:
- Go to the Countries API by Trevor Blake and get some data about the country we've been given using its abbreviation
- Turn that data into a message, and send it along with an image of the country's flag and the device's ID to OneSignal
- Return the id that OneSignal returns
That seemed tough at first but, in my experience, ended up being fairly intuitive. All we have left is to make this GraphQL call in JavaScript, and then we've got the app looking up countries and sending push notifications!
One other feature we wanted to implement was having an <select> on the page with a list of all the country codes, because who is really going to remember the abbreviation of the country they're looking up? I'll come back to my work on that, but for now, let's check up on Pato to see how he's doing.
Part 2: Set Up the OneSignal SDK in your app
In your Web project folder, navigate to the index.html file. Inside of the head HTML tag, paste the code you previously copied from the OneSignal page.
<script src="https://cdn.onesignal.com/sdks/OneSignalSDK.js" async=""></script>
<script>
	window.OneSignal = window.OneSignal || [];
	OneSignal.push(function() {
		OneSignal.init({
			appId: "YOUR-APP-ID",
		});
	});
</script>
Now, locate the SDK files you downloaded on your computer and insert them inside the root folder of your Web app.
After you have inserted the SDK files into your Web project, you'll need to add a <button> to send the notification to yourself. Inside of the <body> tag, add the following code:
<button onclick="sendPush()" id="send-push">SEND PUSH</button>This button will now call a function called sendPush() that we will create inside of the index.js file. Add the following code to the top of your file. This code contains the API key, the GraphQL endpoint from TakeShape, and the project ID:
const projectID = "YOUR-PROJECT-ID";
const apiKey = "YOUR_API_KEY";
const takeShapeURL = `https://api.takeshape.io/project/${projectID}/v3/graphql`;
Once you have added the code above, it's time for you to use it inside of our sendPush() function. Create the sendPush() function by adding the following code:
const sendPush = async () => {
    await fetch(
        takeShapeURL,
        {
            method: 'POST',
            headers: {
                'Content-Type': 'application/json',
                Authorization: `Bearer ${apiKey}`
            },
            body: JSON.stringify({
                query: `
                    mutation {
                        sendPushNotification (
                            user: "${await OneSignal.getUserId()}",
                            countryCode: "${select.value}"
                        ) {
                            id
                        }
                    }
                `
            })
        }
    );
};
As you can see, this code is making a POST call to the TakeShape GraphQL endpoint. The input to our POST request is the mutation containing the information needed to display our push notification. The countryCode property is the value from the <select> dropdown. For testing purposes, the value of the user property is going to be your current userID that you get by calling the getUserId() method for the device you are using to view this web application. In other words, you will send a push notification to your device that has registered with OneSignal. Keep in mind that OneSignal allows sending mass push notifications to all the subscribed users of a website.
Allow Web Push Notifications
Run the app and visit your website. You should see the following prompt appear after your chosen time delay interval:
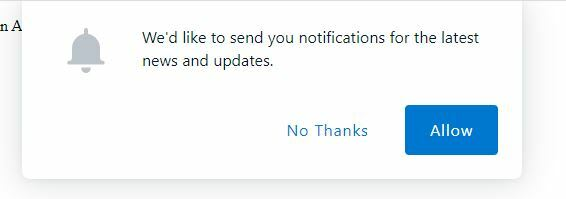
Click on the blue Allow button to enable push notifications on your browser.
If you want to get started by sending a message or two manually, check out this awesome docs page for help.
Back to Jaden. It's time to fill that <select> with actual data! If I go back into the homepage of my TakeShape project, right above the Connect Service button I clicked earlier, check out what's there now:
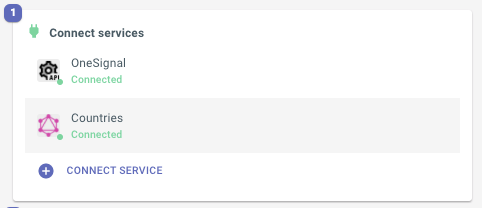
I can click on the Countries service to get back to the form I originally filled out to add the service in the first place, and at the very bottom, there's a button that'll let me select queries from the GraphQL service to duplicate inside TakeShape. In there, I selected the countries query. That means that the countries query that the Countries service exposes will be appended to the namespace I gave the service in the form (that was just Countries) to create a query I can access via TakeShape. In other words, the countries query from the CountriesAPI from Trevor is now the Countries_countries query in our API mesh, and I can use the latter to get my list of countries. That's a little confusing to explain over text like this, but it's actually the most intuitive way to go about this because it lets you choose what queries should be directly accessible through the API mesh. It also means there aren't any conflicts with query names once you start adding more services, since they're all namespaced.
With that out of the way, I could just add this to the JavaScript and load the dropdown with the results:
const loadCountries = async () => {
const resp = await fetch(
`https://api.takeshape.io/project/${projectID}/v3/graphql`,
{
method: 'POST',
headers: {
'Content-Type': 'application/json',
Authorization: `Bearer ${apiKey}`
},
body: JSON.stringify({
query: `
query {
Countries_countries {
code
}
}
`
})
}
);
const results = await resp.json();
results.data.Countries_countries.map(x => x.code).forEach(code => {
const option = document.createElement("option");
option.innerText = code;
select.insertAdjacentElement("beforeend", option);
});
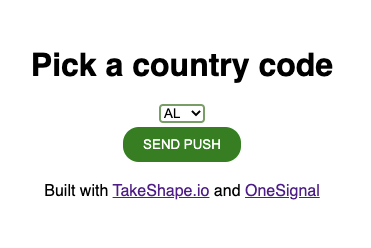
};And that's pretty much it! Take a look at the GitHub repo for the full code. You can check out the finished product at https://takeshape-onesignal-country-lookup.vercel.app/.
Let's test it out quick! If I go the page, it should quite quickly ask me for permission to send push notifications. In the background, that loadCountries function is running, which loads up the dropdown. If I choose one and press the Send Push button like this:
Then this happens:
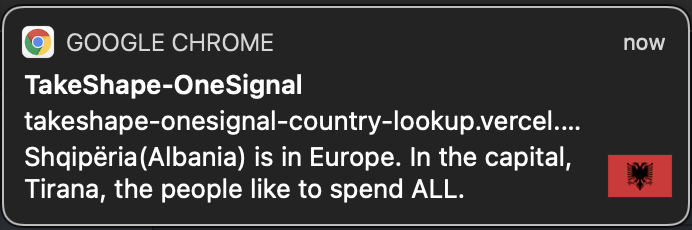
Success!
Now, you can keep expand your code to make use of different features of the OneSignal SDK across your web app. To learn more about the Web Push SDK, visit OneSignal's docs. If you want to check out more of TakeShape's abilities and how it makes working with APIs much easier in the long run, check out the TakeShape docs here.